
Website Evidence Collector
The European Data Protection Supervisor (EDPS) has published a tool that can be used to inspect a website and report which cookies and related technologies are being used. It’s called the Website Evidence Collector, it’s open source and published under the European Union Public License.
If you own / maintain a website, it can be hard keeping track of all the cookies and related technologies. Having a good overview is important though: you need to inform your visitors, often ask for consent before placing certain cookies and keep your privacy policy / cookie statement up to date. But with an eager marketing department, an enthusiastic dev-team, innovative suppliers and the wild-west of tag-managers it’s hard to keep track of all these technologies constantly being introduced to the feature stack of your website. Getting in control of this really only has one solution: automated checks. And that’s exactly what you can use this tool for.
We think it’s a great initiative which is why we’d like to spread the word and walk you through some of the features this tool is offering.
About the tool
The tool is relatively new (0.4 has just been released), but it already contains a lot of nice features. It supports multiple output formats which makes it easy to extract very specific information from it (in an automated way) and since the last release it contains a templating system which allows for the creation of reports that managers understand. Another very important feature is that it does not only report on cookies, but also on Local Storage (web storage) and Tracking Pixels (web beacons) – technologies that (may) also require consent, but that are often overlooked.
The tool really mimics a real visitor on the website: under the hood a web-browser is spun up and will visit all the pages of your website, just like a real visitor would. And just like it does with a real user surfing the website, it will record all the cookies and other resources it encounters; this is what will be extracted by the website evidence collector.
Setting up the tool & support
The installation has been well documented (so we won’t go into detail about that here) but depending on your technical knowledge it might not be very straightforward. It requires you to install NodeJS and several dependencies and Windows users should be aware that it has not been (officially) tested on that OS yet.
How to use the tool
Most of the examples in this post will use www.your-website.com as the domain name of the site that’s being analysed. This domain you obviously have to substitute for the actual domain that you want to scan.
Most basic example
The initial setup might require a bit of effort, but performing a scan is a breeze once that is done. You simply execute the command and pass in the location you want to scan.
website-evidence-collector https://www.your-website.com/
It will create a folder called output (in the folder where you are when you invoke the command) and in it stores all kinds of information such as a complete and structured inspection overview, individual files with cookies, persistent data and beacons, screenshots and an html file with a report containing all the important information in a nice overview.
If you run it again it will probably complain that the output folder already exists: in that case you need to either remove the folder or specify another location for the files it generates with the -o flag:
website-evidence-collector https://www.your-website.com/ -o newoutput
Please note that:
- The above examples will scan only 1 page of the website (which is the exact location you pass as parameter)
- If your website asks for consent before placing certain cookies, you will only discover the cookies as if consent was not given.
Keep on reading to learn how this can be improved…
Scanning multiple locations
There are two ways to scan more than just one page:
- Using the
-lparameter: This allows you to pass multiple locations for scanning.website-evidence-collector https://www.your-website.com/ -l https://www.your-website.com/ another/page.html -l https://www.your-website.com/yet/another/page.html
- Using the
-mparameter: With this parameter the tool will act as a spider (a bot crawling and indexing webpages), following all the links it encounters on a page. The value given to this parameter will determine the maximum amount of links it will follow. For example:website-evidence-collector https://www.your-website.com/ -m 50
will follow 50 extra links. It defaults to 0 which is why omitting this parameter will limit the inspection of a website to 1 page only.
Scanning the locations of a sitemap file
This is not a build-in feature of the tool, but as a bonus we’ll show you how you can feed a sitemap file to the wec-tool so it can scan all its locations.
First execute the following bash commands:
WECLOCS=""; while read -r line; do WECLOCS="$WECLOCS -l $line"; done < <(curl -s https://www.your-website.com/sitemap.xml | grep "<loc>.*</loc>" | sed -n 's:.*<loc>\(.*\)</loc>.*:\1:p');echo $WECLOCS | awk -F '-l ' '{print "\nfound "NF-1" url(s) in the sitemap"}'
Note: Make sure you replace https://www.your-website.com/sitemap.xml for the actual location of the sitemap file!
What it does: it retrieves the sitemap file from the location you specify and puts all the urls it can find in a variable ($WECLOCS). When it has done that it will output how many urls it was able to find in the sitemap file. If it has found 1 or more locations then you can feed this to the website-evidence-collector like this:
website-evidence-collector https://www.your-website.nl $WECLOCS
This basically adds all the discovered urls from the sitemap file as -l arguments to the wec-tool.
Scanning as if you’ve given consent
If you’re scanning a website that asks its visitors for consent before placing cookies or similar technologies, then you probably want to discover these extra cookies as well. By default the wec-tool will not detect these extra cookies, but there is a parameter you can use to make this work.
In almost all cases, consent is stored in a cookie1, so the only thing you need to do is find out what the name of the cookie is and what the value is that indicates consent has been given. Once you have this information you can add this cookie as a parameter to the execution of a scan, using the -b parameter.
Please note that at the time of writing, this option (to specify cookies) is only available if you download the current Master version from github. It’s not part of the official 0.4 version, but it will be part of the 0.5 release.
Finding the consent cookie
In case you don’t know which cookie is responsible for recording consent on a website, then this is how you can find out:
- Open a new private window in your browser (please note that it’s important that there are no active private windows before doing so)2.
- Open the website you intend to scan – and do not yet press the consent button!
- Activate the Developer Tools of your browser (in a lot of browsers this can be achieved by pressing F12)
- Go to the console of the Developer Tools and execute this code:
sessionStorage.setItem("cookiesBefore", document.cookie);This stores all the current cookies in the SessionStorage of the browser (what means it will automatically be deleted when you close the browser) - Now press the consent button (accepting all cookies) and after that execute the following code in the Console:
var cookieArr = sessionStorage.getItem("cookiesBefore").split("; "); cookieArrNow = document.cookie.split("; "); for (var k in cookieArrNow) { if (cookieArr.indexOf(cookieArrNow[k]) < 0) { console.log(cookieArrNow[k]); }}This code compares the cookies in the sessionStorage (that you stored there previously) against the current cookies. The difference – all the cookies that were set after clicking the consent button – will be displayed in the console - Once you’re done, close the private browser window
As an example, the snippets above have been executed on the website of the Website Evidence Collector:
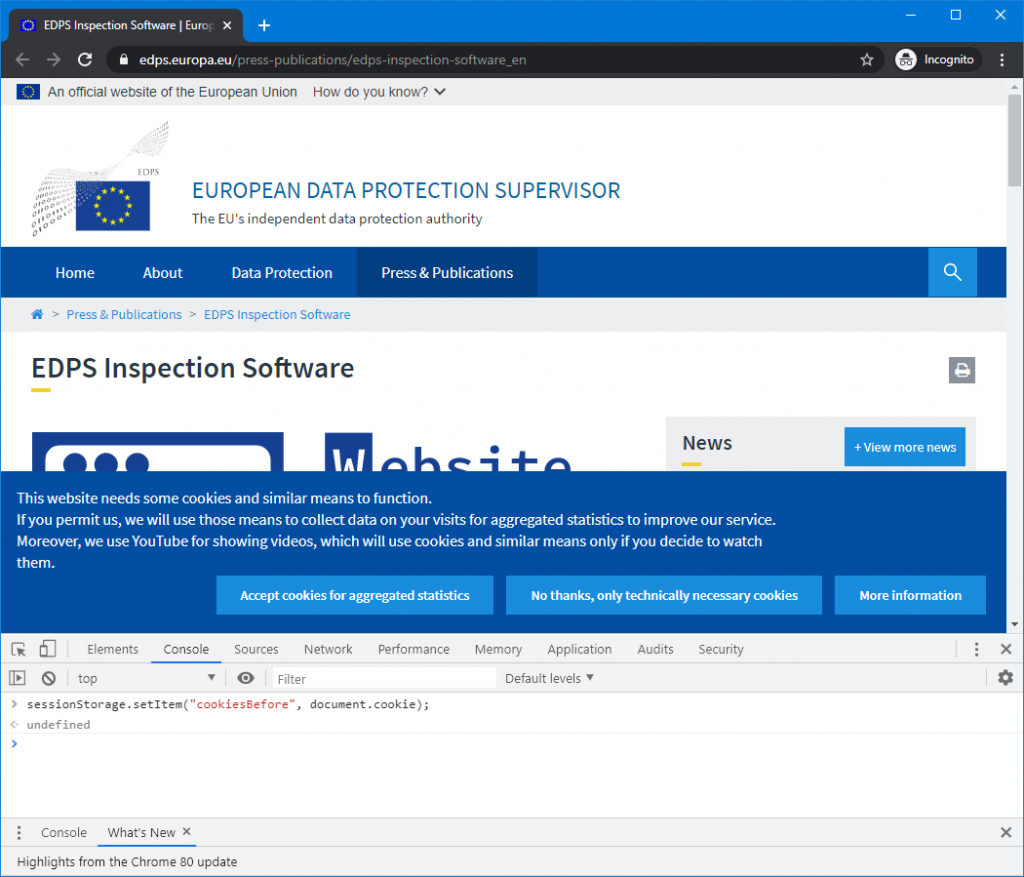
In this image you can see the website, the buttons where they ask for consent and the first code snippet in the Console of the Developer Tools. After clicking on the ‘Accept cookies for aggregated statistics’ button the second code snippet was executed, which yielded this result:
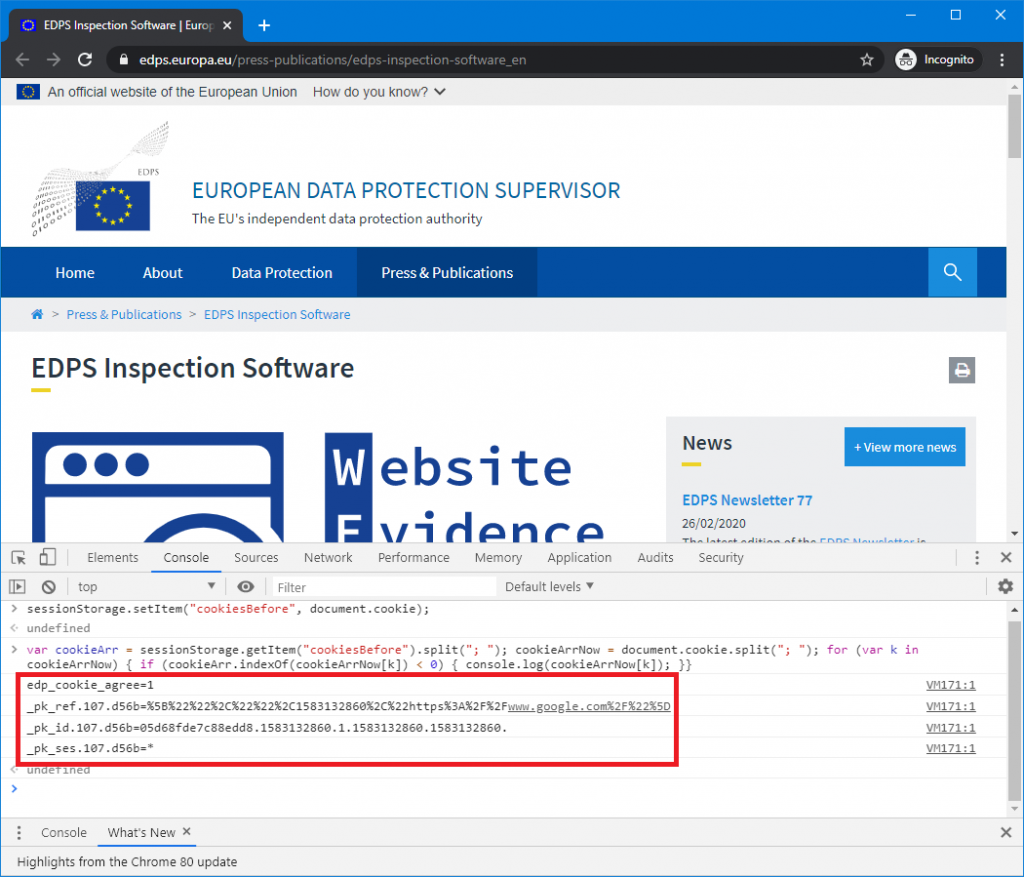
As you can see: four cookies were added, but not all the four cookies are used to register consent. This is what will typically happen: because you give consent, a number of additional cookies with different names will immediately be placed – after all, that’s what you’re giving consent for. What the name of the consent cookie is, really depends on the website; but usually (although not always), the name will give it away. In this case it’s easy to spot : edp_cookie_agree=1. This means the name of the cookie is edp_cookie_agree and it has the value 1.
Setting the (consent) cookie in the Website Evidence Collector tool
To use this consent cookie in the wec-tool, you execute it as follows:
website-evidence-collector https://edps.europa.eu/ -c "edp_cookie_agree=1"
When the tool runs, it will generate output on the command line (unless you suppress this with the -q flag). Lines 2, 3 & 4 of this output will give you visual confirmation that the cookie is used. This is an example of what it will more or less look like:
{"type":"Browser","level":"info","message":"browsing now to https://edps.europa.eu/","timestamp":"2020-03-02T07:03:36.019Z"}{"level":"info","message":"cookie parameter is not an existing file; parsing it as key=value pairs","timestamp":"2020-03-02T07:03:36.024Z"}
{"level":"info","message":"going to set 1 cookies","timestamp":"2020-03-02T07:03:36.024Z"}
{"level":"info","message":"setting initial cookie : edp_cookie_agree=1 for request https://edps.europa.eu/ with expiration -1","timestamp":"2020-03-02T07:03:36.025Z"}
Line 2 states that the value given to the -c parameter is not a file and that it will therefor treat it as a key-value pair. That is correct in this case (how to use files will be discussed later). Line 3 reports that it will set 1 cookie (this is also correct). And as you can see, Line 4 states that it is setting initial cookie : edp_cookie_agree=1 for request https://edps.europa.eu/. This feedback can be useful if the scan doesn’t have the expected result.
Another valuable check can be to have a look at the screenshots that the tool makes. If giving consent failed, then the consent-question will be displayed in the screenshot as well (if that is what your website does).
Setting multiple cookies
Setting multiple cookies can be achieved the same way as setting a single cookie, you simply separate them with a semicolon: -c "cookie_one=value1;cookie_two=value2". If you want visual confirmation that all cookies were set correctly then you can do so by observing the output as explained in the previous paragraph.
Setting cookies using a cookie-jar file
Instead of specifying the cookies on the command line, you can also specifiy a file which contains cookies (called a cookie jar). You can use the same -c parameter for this, as it works in much the same way as curl -b does: besides key-value pairs it also accepts (paths to) a file that it will then parse. In fact, the format of the contents of the file needs to follow the same specifications, which can be found here : https://curl.haxx.se/docs/http-cookies.html. In practice, we suspect you won’t use it much, but the possibility is there.
Suppose your cookie file is called cookiejar.txt then you can use it as follows:
website-evidence-collector https://edps.europa.eu/ -c "cookiejar.txt"
The wec-tool will detect that the value of the parameter is an existing file and will try to parse it.
Checking that the cookie-settings worked
If you set a consent cookie with your wec-scan, and you want to compare it to a scan without consent cookie, then we recommend the following procedure:
- Run the scan without cookies and save the output in a designated folder (e.g. name_website-default)
website-evidence-collector -o website_default https://edps.europa.eu/
or without consent (this will have (or should have) the same effect)3website-evidence-collector -o website_default -c "edp_cookie_agree=0" https://edps.europa.eu/
- Run the scan again, but this time with the consent cookie and save it in a different folder (e.g. name_website-consent)
website-evidence-collector -o website_consent -c "edp_cookie_agree=1" https://edps.europa.eu/
- You now have both scans in a separate folder, which you can compare using a tool of your preference
There are several command-line tools which allow you to do a quick check. Here are a few suggestions:
- jq : a command line JSON processor
For example:jq '.cookie | length' website_default/inspections.json jq '.cookie | length' website_consent/inspections.json
This will output the number of cookies that were found for the scan without and the one with cookie consent.
jq is a very nice tool overall when you’re working with json data on the command-line. So if you start building functionality on top of the output of the wec-tool, we can recommend using it. - using diff:
diff edps_default/cookies.yml edps_consent/cookies.yml
This will show all the differences between the cookie files – including all the cookie information - And of course grep
grep "name:" edps_*/cookies.yml
This will show the names of the cookies that were found in both scans - Or, if you’re on windows and want to use a gui: winmerge
Conclusion
If you’re not already scanning your website(s) regularly or if you have difficulties getting the right results, then give this tool a try!
1. It might seem strange that the consent-choice is stored in a cookie. “A cookie? But what if you don’t give consent?” Well, this cookie is a very good example of a cookie that is necessary in order for the website to function properly. And while you should always inform your visitors about the cookies you’re placing, you don’t need consent to place functional cookies – like the one to store consent
2. When comparing cookies before and after giving consent it’s important you do this in a private window and that there are no active private windows prior to your investigation because cookies are shared between tabs/windows.
3. Running the tool without cookies should have the same effect as running the scan ‘as if consent is not given’ (the equivalent of pressing the no-thank-you-button). If the website has implemented this properly then it should always assume consent is not given as long as it hasn’t been made explicit.